


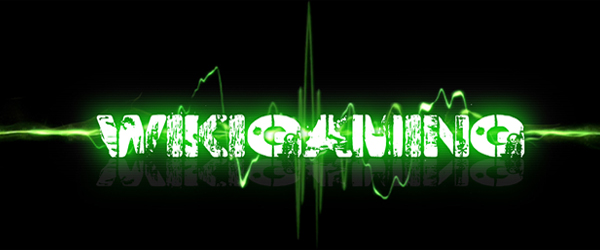


In this tutorial, you will learn how to create the text effect used in designing the logo of Call of Duty: Modern Warfare video game by using some simple Adobe Photoshop techniques.
Things required:
1. A PC/Laptop/Netbook2. Adobe Photoshop (We have used Adobe Photoshop 7.0 in this tutorial)
3. Skills to operate mouse and keyboard (1)
4. A little patience(2).
#1st step - Create a new canvas in Adobe Photoshop.

#2nd step - Fill the background layer.
We fill the Background layer with black (recommended, you can choose any color you want) by setting the "Foreground color" to black in the Tools Panel by choosing Edit -> Fill (while the Background layer is still the active layer in the Layers Panel) making sure that the Use option is set to "Foreground Color", and pressing OK. That will fill our Background layer with the desired color. Another way is by using the "Paint bucket" tool with color set to black. All you need to do is click on the canvas and the "Foreground color" will be changed to black.
We fill the Background layer with black (recommended, you can choose any color you want) by setting the "Foreground color" to black in the Tools Panel by choosing Edit -> Fill (while the Background layer is still the active layer in the Layers Panel) making sure that the Use option is set to "Foreground Color", and pressing OK. That will fill our Background layer with the desired color. Another way is by using the "Paint bucket" tool with color set to black. All you need to do is click on the canvas and the "Foreground color" will be changed to black.

#3rd step - Text editing.
Download the Bank Gothic Light BT font and install it in your computer(2) if you don’t have it. Choose the Horizontal Type Tool (T) from the Tools Panel. In the Options bar, set the font to Bank Gothic Light BT and change the color to white and set the font size to 100 pt or some size according to your need. Now, type whatever you wish like (which you want to convert into a logo).

Structure-
>Blend mode: Screen
>Opacity: 75%
>Noise: 0%
>Choose the Lime Green color (#00FF00)
Elements-
>Technique: Softer
>Spread: 0%
>Size: 55%
Quality-
>Range: 50%
>Jitter: 0%
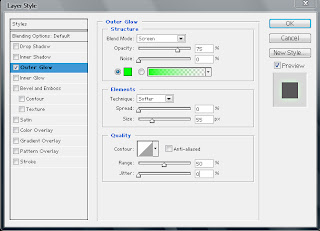

#4th step - Adding a outer glow style.
We now change the settings of the text layer by adding the outer glow style. To add this style right click on the text layer in the layer menu in bottom right corner and click on "Blending options.." option.


Now DOUBLE CLICK on the "Outer glow" option and change the presets to the below mentioned settings:
>Blend mode: Screen
>Opacity: 75%
>Noise: 0%
>Choose the Lime Green color (#00FF00)
Elements-
>Technique: Softer
>Spread: 0%
>Size: 55%
Quality-
>Range: 50%
>Jitter: 0%

#5th step - Creating a repeating pattern.
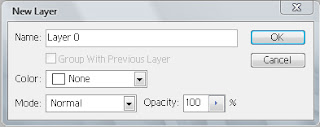
To complete the effect, we must create a Photoshop pattern that we’ll apply to our text. To do this, first create a new Photoshop document with the following settings. Note that the dimension of the canvas is very small, 1px width and 3px height.


By default, the Background layer of the new document will be locked an un-editable. Double-click on the Background layer from the layer menu in bottom right corner to open the New Layer dialog box. Press "OK", and the background layer will be unlocked and renamed to Layer 0.

Since the canvas is small, use the "Zoom Tool (Z)" to zoom in as close to the canvas as possible. Use the "Pencil Tool (B)" to draw a 1px black square box (change the pencil size from the settings toolbar that appears when you select the pencil tool) right in the middle of the canvas. Select the entire canvas using Select -> All (Ctrl + A). Choose Edit -> Define Pattern, and name it. Now we can switch back to our original canvas with our text and apply the repeating pattern we just created.


#5th step - Applying the repeating pattern.You should have now switched back to the original Photoshop document (and you can close the pattern document after defining it). Choose the "Pattern Stamp Tool (S)" from the Tools Panel.

In the Options bar, change the Clone Stamp Tool’s option to the settings below.
>Brush size: 155 px
>Mode: Normal
>Opacity: 10% (or according to your need)
>Flow: 100%
>Pattern: Choose the pattern we created in the previous step.
>Brush size: 155 px
>Mode: Normal
>Opacity: 10% (or according to your need)
>Flow: 100%
>Pattern: Choose the pattern we created in the previous step.
Now, take the clone stamp tool and draw/paint over your text.
Note: Click on "Yes" if asked to Rasterize your layer.
 #6th step - Applying the green flares in the background of the text.
Click and open the image below in a new window/tab. Now, Right click and save it on your computer.


Note: Click on "Yes" if asked to Rasterize your layer.

Click and open the image below in a new window/tab. Now, Right click and save it on your computer.

Now, open this image via Adobe Photoshop by going to File -> Open -> Locate the file on your disk, select it and press "Open".

Now, drag the Green flares to your original Text canvas and adjust its size and width according to your needs.


Experiment with the font and other blending options if you are good at Photoshop. This is what the final results can look like:

Excellent post! Bookmarked it! Thanks for sharing this post,I never forget this happyness after read this good content information.Ha! I love it. Thanks!
dedicated hosting reviews
Thank you very much!! Very usefull! ;)